Why Buy Art Directly From An Artist Website vs. Art Marketplace?

Artists today have more places to sell their work than ever before. The traditional options of galleries and art festivals remain effective sales channels, but each comes with its own barriers to entry. The Internet has both leveled the playing field and flooded the market with junk. While marketplaces like Etsy, Fine Art America, Art.com, Artsy, Artspace, Singulart, and the list goes on… have made acquiring art in some ways easier for the art buyer, they have also made it difficult for new artists to get noticed in such a crowded space that is often controlled by opaque algorithms. Also, in many cases what is being sold are prints produced by production houses that have automated print-on-demand technology to enable high quantity, low touch, and low-cost production. Some artists favor this approach because once they load images of their artwork into the system, they don’t have to do anything. The whole order processing and fulfillment are done for them, and they simply get paid for each order.

So why purchase prints directly from the artist’s website? First, you are likely going to be getting prints made by the artist themselves and more of your purchase dollars go to the artist rather than the marketplace and production house. You also will likely have the opportunity to engage directly with the artist. It has been my experience as both an artist and an art buyer that the personal value of the art increases when artist and buyer have a relationship.

So, if you have an option to buy directly from the artist, I strongly recommend it.

How To Hang Art On The Wall

If your household is like ours, the art you buy doesn’t always make it on to the walls.  For us it is a combination of already full walls and competing priorities.  If however your walls remain bare because you find hanging art frustrating, intimidating, or simply fiddly, what follows should help.

Let me begin by saying there is more than one way to hang art, and this is simply the method that has worked for me.  If you have approaches that could help others, please share them in the comments below.

Selecting A Frame

The first step is to get the piece into a frame, if it did not come in one. A quality frame will enhance the piece of art both aesthetically and in terms of longevity. In selecting a frame, your budget should be proportional to the quality and investment of the art itself. An original work or high-quality limited-edition print deserves a high-quality frame and UV-filtering glass or acrylic to protect the piece from fading.  Similarly, if it is an inexpensive high-volume print, don’t break the bank on the frame.

Preparing The Frame To Hang

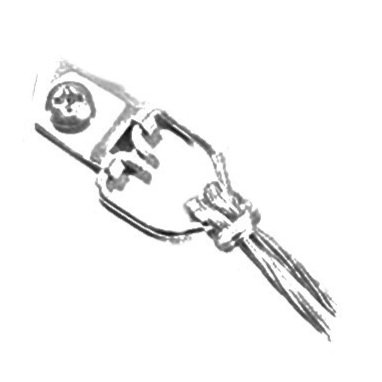
If your artwork is in an 11” x 14” or larger frame, I recommend using D-rings and picture hanging wire on the back rather than sawtooth hangers.  The D-rings should be attached about 1/3 of the way down height of the frame.  I have found that a vinyl-coated stranded wire works best.  Begin by attaching the wire to one D-ring with a Lark’s Head Knot (see diagram) and then wrap the tail around the wire 8 – 10 times and cut off any excess wire.  This will assure a secure no slip connection.  Allow enough wire so that tied off on both sides and then pulled taught the wire is at least 30° above horizontal.  To make hanging on the wall easier, if you are wiring multiple frames, make the distance between the top of the taught wire and the top of the frame the same on all your frames.  We will see why this is helpful later.  Tie off the wire on the other D-ring with a Lark’s Head Knot and 8-10 wraps as before.  The last step before hanging is to place rubber bumpers on the bottom corners.  This will help protect your walls and aid the picture in hanging parallel to the wall and less likely to go crooked over time.

D-ring and wire

Finished wire

Arranging Art On The Wall

Every room is different, so I will simply provide a few guidelines to get you started.  Just light the rules of composition, these guidelines can be broken when the design requires it. Generally speaking, I suggest hanging the artwork such that the center of the piece or the subject is at eye level.  In terms of horizontal placement, the art in any given stretch of wall should be proportionate to the space.  A single small piece on a large wall will get lost and look out of place.  Likewise, packing lots of art on a wall with little space around each piece will look crowded and overly busy.  When hanging multiple pieces together, the spaces between the edges of the frames should be equal or at least proportional to the works.  Allowing adequate spacing is critical, just as the use of negative space is critical to a well composed work of art.

If all of the pieces to be hung on a stretch of wall are the same size, placement is easy.  They will be hung at the same height with the space between equal and the spacing on the outside to the corners of the room equal or greater than the space between the works. 


Measurements And A Sketch

Sketch of wall and wart with measurements

In this case, I am hanging two square frames whose outside dimensions are 23¾” x 23¾” and the wall section is 98” long. I have elected to space them 12” apart, which is roughly half the width of each piece.  This leaves 19¼” on the outside of the pair to the corners.  This works nicely as it is a little over ¾ of the width of each piece, creating a balance amount of negative space around the two works.

Establishing centerline


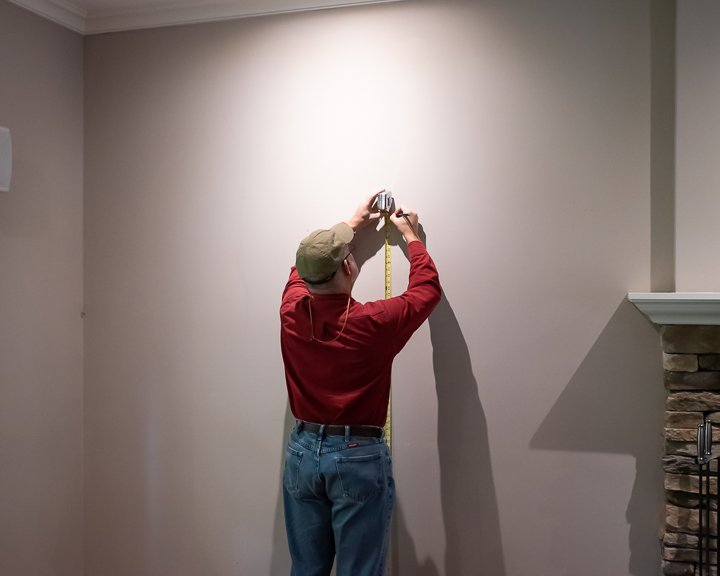
Measuring and marking picture hook height

When hanging larger works (anything over 12” wide) I recommend using two picture hooks.  This will help the frame hang parallel to the wall and minimizes the accidental movements that will cause a piece to hang crooked.  Clearly, placing two hooks on the wall at e correct height is a bit more complicated than using a single hook but fear not. With a few quick measurements and some basic arithmetic, you’ll get it right on the first try!

Measuring Wire Drop

The distance between the two hooks should be approximately ⅓ the width of the frame, in this case, 8” will due nicely.  For me the span between my thumb and pinky when spread as far apart as I can is just shy of 8” so using one hand with thumb and pinky spread I put just enough upward tension on the picture wire to hold it taught and with the other hand measure down from top of the frame to determine the distance below the top of the frame to place the hooks on the wall.  Here I measured approximately 3¾”.  I call this the “wire drop” and now have what I need to figure out the hook placement.

I draw a quick sketch of the wall and the outlines of the frames to be hung. Then I write the following measurements on the sketch. Distance from the floor to eye level (63” for me), distance between the frames (12”, see above), width of wall (98”, see above) and distance to centerline (half the width or 49” in this case), dimensions of frames (23¾” x 23¾”, see above), wire drop distance (3¾”, see above).

Some Basic Arithmetic

Now for the basic arithmetic. If the center of the frame is at eye level (63”) and the frame is 23¾” tall, then the distance from the center to the top of the frame is half the frame height, or 11⅞”.  Add that to the eye level measurement and you have the height of the top of the frames (74⅞”).  Then subtract the wire drop and you have the height of the picture hooks above the floor (71⅛). I then write the picture hook height dimension on the sketch. Next, I calculate the distance from the centerline to the inside picture hooks. I found the distance from the edge of the frame to one of the hooks by subtracting the hook spread (8”) from the width of the frame (23¾”) then divide the result by 2 to get a distance of 7⅞”, then adding that to the distance from the centerline to the edge of the frame is 6” (half of the space between the two frames) gave me 13⅞”. 

Measuring from centerline to inside hooks

Placing The Hooks On The Wall

Start hooks just above pencil marks

Now that I have all of the measurements on the drawing, I begin transferring them to the wall. I measure along the top of the baseboard from the corner over to the point of the centerline (49”) and make a small pencil mark.  I then measure up to picture hook level (71⅛”) and make another small pencil mark.  To double check I measure from the corner out to the centerline at picture hook level and adjust my pencil mark as needed. If you have a 24” bubble level with a ruler marking the hook placement is a snap.  I assume most folks do not so I  will continue with just the tape measure and pencil. Measure from the centerline over to the inside hooks (13⅞”) and make a mark. 

Then I measure up from the floor to picture hook level at the mark, and adjust the height as needed. Then I measured over the hook spread (8”) and made a mark and once again measured up from the floor at the mark to picture hook level and adjusted as needed.  I repeated this process for the second frame, so I then had marks for all four picture hooks.

I selected picture hooks that rated well in excess of the weight of the framed artwork.  In this case I used 20lbs. hooks. Placing the bottom of the hook (not the nail) just above each of the picture hook marks, I drove the nails in with a hammer.  As I drove the nails in the hooks slid down the wall a bit and now the bottom of the hooks are on the marks.  Don’t worry if they are not perfectly level.  You will be able to hang them level, even if your hooks are off by a bit.

By assuring that both pictures’ wires had the same wire drop, I only had to make one set of calculations.  If the wire drops were different, I would have had to measure and calculate hook placement for each frame.

With the hooks in place, hanging each of the frames was easy.  Once hung, I measured the distance between the frames at the top and bottom of the frames to assure they were parallel and measured from the floor or ceiling to the top of the frames to assure they were level or at least parallel to the floor or ceiling.  In older homes, parallel is better then level as the walls are not always plumb and the floor not always level. So with a little bit of planning, measuring, and some arithmetic, you too can hang your art like a pro!

An Emotional Journey

Comparison: Blue Glacier 1982 to 2022 illustrating the dramatic loss of glacier ice due to climate change.

If you follow me on social media you have seen a series of posts from my project Blue Glacier Then & Now, showing how the glacier has changed over the past 40 years. A number of friends have responded with sadness and empathy.  Empathy for me assuming that witnessing the significant loss of glacier ice would leave me deeply saddened.

The experience of journeying back to the Blue Glacier and seeing it as it exists today has been a real roller coaster.  My emotional journey started when the idea of the return trip first began to form.  As I daydreamed of going back, I was full of excitement and curiosity. As the dream began to take shape and become events on my calendar anxiety began to weave its way through the excitement.  The first set of hurdles one needs to clear for any significant endeavor all stem from self-doubt and the excuses we tell ourselves of why we can’t do something.

“Where am I going to get the money?” “How can I possibly devote that much time to non-income generating work?” “What if my 58-year-old body isn’t up to the physical demands?” “What if I fail?” What if the pandemic peaks again and interrupts the trip? What if people don’t want to hear my story? What if trolls start coming after me and my family?

Pike Place Market, Seattle, WA

Any one of these doubt ladened questions could have stopped the project before it got started, and the questions and doubt continue.  Even as I write this and the adventuring portion is behind us, the questions and doubt remain a daily challenge.

As we pulled out of the driveway on our way to the airport it was no longer just a planning exercise, it was really happening.  We were on our way across the country, back to that magical and mystical land that had etched itself on my soul all those years ago.  At this point a youthful giddy excitement was flowing through me.  My dreams were coming to life.

After a couple of days of playing tourists Seattle, we stop to visit old friends with whom I had stayed just prior to venturing into the Olympic Mountains back in 1982.  The short 16 hours with them was full of warmth, love, and lots of joyous memories.  Reconnecting with the people that were apart of my first encounter with the Blue Glacier was one of the great gifts of this journey.

Hoh River Trail trailhead

Following a short night’s sleep, we were up and on the road for the trailhead before dawn.  Hearts pounding with nervous excitement we traced the curving roadway through the lush green of the Olympic peninsula toward the Hoh Rain Forest Visitor’s Center and the Hoh River Trailhead. With energy and emotions high, we set off down the trail. 
We were DOING IT!

Ladder climb down an avalanche chute below Glacier Meadows

Toward the end of the day, I was getting tired, and we still had a few miles to go.  I had underestimated the trail distance to our first camp and those pesky questions of doubt began to creep into my mind.  Day one was the “easy” day.  Tomorrow was the big climb, and I was feeling shattered.  Through the exhaustion and niggling doubt, I also felt love and support.  My trail crew, two of my children, Colin and Will, stepped up to fetch the water and make dinner.  Now fed and with water replenished for the following day I slipped into my sleeping bag knowing the next day would be hard, very hard, and this team would make it because we worked together and each of us helped the others in more ways that we will ever really understand.

As anticipated, hiking the trail from Lewis Meadows to Glacier Meadows proved to be one of the hardest things I have ever done.  Gaining 3,200 feet in elevation in under seven miles with 40+ lbs. packs is not for the faint of heart.  As the day wore on and my body began to tell my brain to “STOP”, I drew on my mental stamina by breaking down the trail into small bite-sized chunks.  Rather than thinking about the miles yet to walk and hundreds of feet yet to climb, I looked down the trail and picked my next goal.  “I can hike to that fallen tree,” I told myself. So, with slow and steady steps, frequent short breaks, and the support and encouragement of my crew, we made our way up the mountain.  As the steps became harder and at times more painful, the niggles of doubt began to swirl in my head. 

“I should have trained more.” I’m going to let my supporters down.” “What the heck was I thinking?” “I’m a foolish old man.”

I could sense a desire to quick beginning to creep in at the edge of my consciousness. As we soldiered on and my body became almost numb, I started to think about the purpose of the trip, to share my personal story of climate change with the world, my spirit drew on the strength of my supporters.  I also found myself drawing on the energy of the living world around me.  We had a small chuckle as I remarked that I was tapping my inner Jedi and feeling the Force that runs through all living things.

I can honestly say that even in my moments of breathless exhaustion on that day’s hike, I somehow knew we would make it.  When the body and mind can not carry you through, your spirit and a sense of purpose in something greater than yourself can enable you to do far more than you think possible.

We slept in, with hopes of a strong recovery. As the sun rose over the ridge the following day, I fully expected my body to be rebelling from the prior day’s over exertion. I was pleasantly surprised at how good I felt.  This was the day I would see the glacier again.  Fueled and hydrated we set off on the climb up to see the glacier around mid-day, another 700-foot climb in elevation.

Following an initial unsuccessful foray toward the terminal moraine, we turn and headed up to the lateral moraine.  With frequent stops to rest, we made it to the moraine around 5:45pm. The initial view felt like a gut punch. So much of the glacier was gone and what was left was gray and dirty. All of the rock and gravel till that was left behind by the layers of ice that had been laid down over hundreds if not thousands of years which had melted away now covered much of the lower end of the glacier.

Waves of emotion washed over me. Intellectually, I was prepared for the loss of ice, but emotionally, I felt blind-sided.  Feelings of deep sadness and regret felt like they would drown me.  As I began to gather myself and focus on the moment sadness gave way to anger.  Anger that we as a society could be so stupid and arrogant to allow our collective actions to have such a devastating impact. Anger that current and future generations will never see the beauty and grandeur of the glacier as I first knew it.

The day was coming to an end and there was work to be done.  Once again focusing on the broader goals of the project helped me move through the challenges and pain of the emotions.  Pulling out the stack of prints I had brought of the 1982 images; I worked to find the vantage points and recreate the pictures.

With a handful of the images successfully captured, I then began to assess the plan for the following day to venture out on the glacier itself to recreate several images from my first glacier traverse.  It quickly became clear that the trip down and back up the lateral moraine would be not only challenging, but dangerous as well, given my fitness level.  It appeared that we had lost 75 – 100 feet of ice thickness , adding that much more to the descent.  Additionally, the moraine was a massive scree field, full of loose rocks and boulders.  One wrong step and down you would go.  Fatigued muscles and an exhausted mind would only amplify the risk.  The decision was clear, we would not venture out on the glacier.

As the sun began to set down the valley, we headed back to camp, spirits were low.  I was tired, emotionally drained, and disappointed that we would not be able to explore the glacier itself.  I also felt guilt in having the crew carry the weight of the rope, harnesses, ice axes, etc. that would remain unused.  Once back at camp and before we lost the light of the day Will, who was filming our journey, asked me to do a piece to camera reflecting on my experiences of the day.  As we had hiked back down for the night, I had begun to challenge myself.  Presented with this very tangible evidence of our warming planet, what could I do, no, what would I do about.  What changes would I make in my life to help slow the effects of climate change?  We already do the easy stuff, compost yard and kitchen waste, recycle as much as we can, and live in an all-electric home powered in part by renewable and nuclear energy. Plus, we have invested in efficiency improvements including window replacement, enhanced insulation, and new high-efficiency heat pumps.

Will filming my reflections on the first day with the Blue Glacier

First and foremost, I deepened my resolve to share my story and bare witness to the changes I have seen.  Sharing personal compelling stories is one way of getting over the divide in society and beginning to work together to make the collective changes required to avoid the worst of the impacts of a warming planet.  I also committed to more local political engagement.  Our elected leaders need a clear understanding of the mechanisms of global warming and the impacts it will have on society and the economy.  Well informed leaders lead to effective policies.

What I also realized was that at both a personal and societal level one of the major obstacles holding back a more sustainable lifestyle is money.  I would love to replace my gasoline powered car with an EV and install a solar array and battery bank to charge it and power the house, but we can’t afford to do it right now.  The same goes for the whole society.  We need to introduce policies that incentivize a rapid move away from fossil fuels into clean and sustainable energy.  We can’t achieve the level of change through individual actions alone.  We need to make it a societal priority to change.  We have the technology, and we know what the policies should be.  We just need the collective will to do it.  The answer is simple really.  Introduce a carbon tax that is progressively phased in over 5 – 10 years.  Use the proceeds from the tax to fund clean energy adoption incentives to bring down the cost to individuals and businesses to make the change.  The relatively short-term negative impacts on the economy from higher fuel costs and lost jobs in the fossil fuel industry will be offset by job and economic growth in the clean energy sector.  I remain hopeful that these changes can and will happen.

As I reflect back on the experience I am filled with a sense of gratitude.  I am grateful for the chance to return to Olympic National Park and to share that experience with my family.  I am grateful for all the support and kindness we received from our financial supporters, friends and family with their words of encouragement, and to many the folks we encountered on the trail who fortified our spirits and offered to help share my story.

The emotional journey I am on continues to surprise me.  Despite the pain and sadness I have experienced, I remain hopeful that humanity can turn the ship and begin a new course that will bring a bright and sustainable future.   For without hope, we have already lost.

The Genesis of an Environmental Documentary Photography Project

Terminus of Blue Glacier and Mount Olympus

If you have been following my social media posts of the past few months you surely have read about my project, Blue Glacier Then & Now: A Personal Photographic Story of Climate Change Spanning 40 Years. I am well into the planning and preparation for the return trip to Olympic National Park (ONP) in late July.  We are on the eve of spring as I write this and late July seems a long way off, but there is much to be done now if the project is to succeed. Before looking forward, let me begin by looking back to the genesis of this wild idea.

My son, Will, completed the adventure and interview gathering phase of his climate change awareness project, Climate, Kayak, and Conversation, in the summer of 2021.  In it he traveled by sailing kayak from Miami, Fl. to Norfolk, Va. interviewing people in coastal communities to collect and share their stories of how the coast has changed and to get their thoughts on climate change.  The goal of his project is to encourage open personal conversations about climate change through storytelling.  The collection of interviews and chronicles of the adventure will become a documentary film to debut in 2023.  During the pandemic Will’s project got me thinking, what changes have I seen in my life and how can I share that story.  Although I love the coast and visit it often, I don’t have a personal story of coastal changes.  As I worked the ideas over in my head I thought about the summer of 1982 when I spent six weeks working with the Student Conservation Association (SCA) on a backcountry trail crew in Olympic National Park.  Nearly every day we were along side the Blue Glacier, and as a life-long photographer, of course I had my camera with me. 

It was then that the project came into focus.  I would return to the Olympic Mountains and recreate some of the pictures taken in the summer of 1982.  Together with prints of my original images I would create a photo exhibition documenting how the glaciers have changed in the past 40 years.  It was February 2020, and we were just beginning to see the global spread of Covid-19 creating uncertainty about travel and life in general.  If I was to bring this project to life, I needed a plan and dates on a calendar, or it simply wouldn’t happen.  The 40th anniversary of my time in the Olympics was just two years hence.  Plenty of time to properly plan and prepare for such a project.   Motivated by the idea I began to investigate glacier research within ONP.  It didn’t take long to find out that over the past four decades, the park had lost 34% of its glacial ice and at current rates may lose all of its glaciers as soon as 2050. This data fortified my resolve.  I clearly have a personal climate change story to tell.

Planning & Connecting

I began planning the project by reviewing my slide collection from 1982 to see if I had sufficient images from which to draw from for the project.  Next I sketched out a rough timeline for the actual trip to the glacier.  From that came a list of the actions, events, and resources I would need to make the trek.

Beyond creating the images, I also wanted to share my story with my kids.  All three are grown with just one left to finish college.  All three were enthusiastic about the project and a backpacking trip in ONP, but after consulting calendars and assessing their work and personal commitments, only two of the three will be able to make the trip.  Ten to twelve days off for the trip plus planning and practice hikes is a lot to fit into the busy schedules of twenty-somethings holding down a job, pursuing passion projects, not to mention the needs of their partners.

My wife will join the crew and serve as ground transportation and support manager.  Many years as an ICU nurse has taken a toll on her knees and a 4,500-foot elevation gain with full packs is simply not in the cards for her.  Her support off the mountain will make a world of difference in the ease and effectiveness of the trip.

Last but certainly not least, I could not retrace my steps of all those years ago without engaging with some of the people that were apart of my journey in the summer of ’82.  I spent a week with an old family friend and her husband who lived in Seattle before heading into the park.  As luck would have it, they still live in the area and thankfully I have kept up with her over the years.  As was done in ’82, we will be stopping to visit them before hitting the trail.  I also wanted to connect with my former SCA crewmates. Thanks to the efforts of the SCA alumni office, I was able to connect with three from my crew and we had a wonderful Zoom call reminiscing and reconnecting.  I’m looking forward to staying in closer touch going forward than we have in the years since we were together.

Student Conservation Association ONP Backcountry Trail Crew 1982

Fundraising and Logistics

Between airfare, hotel, ground transportation, and some specialty equipment needed for safely traversing the glacier, the cost of such an adventure is a bit more than the typical artist can afford, myself included.  To address the funding needs of the trip I pulled together a detailed budget, then looked at what I could afford to spend, the difference would then need to come through fundraising and in-kind donations. I selected GoFundMe as my fundraising platform given its ease of use, reputation, and reasonable processing fees.  Once the project was setup on the site, I began sharing it across my various social channels.  The donations and words of encouragement I have received have enabled me to begin moving forward, making purchases and commitments needed for the project.  I am deeply grateful to the early donors for their support and confidence.

The first step was to secure backcountry permits in February.  The National Park Service does not allow the purchase of reservations and permits more than six months in advance.  So once the window opened, I logged in and booked our campsites and backcountry permits for late July.

Next, I began to reach out to specialty retailers and equipment suppliers seeking in-kind donations of kit needed for the trek.  Based on conversations with others who have done similar things, this process can take a great deal of patience, tenacity, and time in order to get the project request in front of the right people.  Our equipment list follows below, if you know of an organization or individual that might be able to assist in securing a grant or loan of the equipment, please contact me.

With the on-trail dates set and permits acquired, the next bit of logistics planning was travel arrangements including flights, hotel, and ground transportation.

Training and Preparation

Although my crew are all experienced backpackers, it has been a few years since some of us have been on the trail overnight. So, a series of shakedown hikes were in order to develop the needed endurance, work through equipment needs, and build the solid team needed to make the trek up to Blue Glacier.  Our first short hike is just two weeks away and I can’t wait to hit the trail!

In addition to the training hikes, we will need to detail out our daily trail menu for this summer and acquire the needed food and supplies.  I will be assessing several options from buying the food and carrying with us in our packs on the plane, shipping it to our friends in the Seattle area ahead of the trip, and buying it in Seattle before hitting the trail.  It will likely end up a combination of all of the above.  Things like stove gas cylinders are not welcome on commercial aircraft, so they will be acquired en route to the trail.

We will of course have a GPS for navigation, but we will also have a set of paper maps and compass (2 map sets and 3 compass to be specific).  I love the advantages that modern tech provides even in the backcountry, but I never hit the trail without my trusty compass and a current topo map.  For added safety, we will be carrying a GPS tracker with emergency locator, should we find ourselves in trouble. Despite the area being one of the more highly trafficked backcountry national parks, it is still remote wilderness with no cell signal and help is hours away.

As preparations and training progress, I will post short updates on my social channels and periodic longer updates here on my blog. I look forward to sharing the adventure and final photo exhibition with you.


Equipment Wish List

3 – Ice Axes

3 – Pairs glacier glasses

40-60M – Glacier safety rope (9-10mm static line)

15-20M – Accessory Rope (6-7mm)

1 - Petzl Micro Traxion Pulley (or equivalent)

1 – Ice picket anchor

1 – Ice screw anchor

2 – Basic climbing harnesses

10 – Locking “D” Carabiners

6 – Non-Locking Carabiners

1 – Water filter system (3-4L gravity system)

1 – Think Tank MindShift Rotation 180 50L+ backpack

Artist Spotlight: Jaimon Caceres

Image Credit: Jaimon Caceres

Image Credit: Jaimon Caceres

This series of articles will feature a discussion with a contemporary artist centered around five simple questions that will allow us to explore their artistic journey, creative process, and sources of inspiration.  Our first Spotlight Artist is Jaimon Caceres.  Jaimon is a colored pencil artist based in Raleigh, NC.

Jaimon Caceres is an accomplished colored pencil artist based in Raleigh, NC.  He grew up on a small family farm in western North Carolina.  His artistic career began as a ballet dancer.  Following an unfortunate injury Jaimon hung up his dance shoes and returned to his first love, drawing.

Jaimon is inspired by beauty, finding  it in a variety of subjects from ballet to historic cities and nature. Any subject can translate visually with colored pencils, and he loves challenging himself with each new series to push the boundaries of what is possible with this medium.

Currently he lives in downtown Raleigh, NC, with his husband and two dogs. You can see his work in person at his studio in Artspace (studio 214).

Jaimon Caceres
Artspace NC, Studio 214
201 E Davie St
Raleigh NC, 27601
hello@jaimoncaceres.com
www.jaimoncaceres.com

What is your earliest memory of making art?

JC:  My earliest memory is kind of a funny one. I’ve drawn since before I can remember. I have vivid memories of sitting in my bedroom and running out of paper constantly, and then drawing on my white bedroom walls with crayons.

How did you come to your current primary media?

JC:  I’m the youngest of four kids, and some of my older siblings were actually very good with graphite. They did a lot of really interesting graphite sketches, and I always loved what they did. As I got older, I started experimenting with it myself. I really did want color though. Initially, I was intimidated by colored pencils, so as I got into young adulthood, experimented with most of the mediums out there. And all of the liquid-based, paints and things, just didn’t behave, and I didn’t enjoy that. I like really being able to have the precession that I needed. So that kind of brought me back to my pencils.  Then I slowly started trying colored pencils, and it really just stuck. Kind of the marriage of the color I wanted and being able to control it the way I need to.

What inspires your art? / Where does your art come from?

JC:  I love this question because, I think it has changed for me over time.  To be honest right now, it’s kind of going through a process of change at the moment, which is exciting. A common thread has always been depth. Really dramatic imagery, dramatic lighting, dramatic color, that’s always what I’m drawn to, and that is what I am hoping to create in my art.  I do feel at times I have strayed in and out of that, and it hasn’t always been as clear.  But as I am a little bit more, I hope, mature in my career, I’m kind of honing in on what that feeling is.

What advice would you give artists just starting their art journey?

JC:  I could talk about this for hours, but I have narrowed it down to four things:

  1. Know who you are as a human being.  Because if you don’t know who you are, and what’s important to you, and what you love, your art isn’t really going to say anything.  So, then what’s the point? But it is really hard sometimes to know who you are, very vulnerably. So, figuring that out is a good first ground zero kind of step.

  2. Only take advice from people that are experts. I don’t know what it is but as soon as you are a visual artist, everyone has an opinion on how you should be doing things.  You wouldn’t meet a surgeon and tell them you really should be operating on people this way… So, only take advice from people whose careers you admire and know what they are talking about. Because taking the wrong advice can really mess you up.  It’s messed me up.

  3. Accept and fully embrace that you will make a million mistakes. That was so hard for me.  It is still sometimes challenging, I think because we care so much about it, or we wouldn’t be doing it.  What we put out into the world we want to be, you know, perfect, and it’s never going to be.  And sometimes we are going to really screw things up. I think the faster you just embrace the fact that is going to happen and get over it, it just makes life so much easier, and allows room for creativity to come in.

  4. This is really the most important one, and my mantra, remember to enjoy creating.  It is so simple, but we forget. The whole point is to be doing something that we love. We get in the mire sometimes of the figuring out, and the trying to make it work, and get ourselves out there.  And it is all very frustrating and then we realize we have to be businesspeople as well as creatives, and that’s just extremely annoying. But at the end of the day, the whole point is that we love it. And I have to remind myself of that daily.  Ok, I’m doing this because I love it.  So I allow myself to love it.

What artist would you recommend that people check out, and why?

JC:  Kind of a recent discovery, her work is completely different from mine. There is a London-based contemporary abstract painter named, Alice Sheridan.  Her work is great, there is something about the way she is presenting it. Her social media, and on her website and she has a podcast in it. She is just completely like doing her.  It obvious in her work, there is no bullshit. I’ve been really enjoying her lately, and I got to meet her over Zoom and chat with her a little bit.

Listen to our full conversation on the Artist Spotlight podcast.

My Walks in the Woods


tlcbadge_transparent%5B1%5D.jpg

The summer of 2020 was unlike any other in memory.  The modern world was shutting down and society was fracturing as it wrestled with race, privilege, and increasingly divergent world views.  I needed help.  My creative energy pool was empty, I was finding myself spending days on end never leaving the house, and my overall mood could be described as “meh”. 

It was in this context that I learned of the Triangle Land Conservancy Hiking Challenge.  TLC invites would be hikers to explore six of their nature preserves within one year.  To complete the challenge all hikes must be logged on the TLC website and shared with #HikeTLC on social media.

I have been a member of Triangle Land Conservancy for many years.  If you do not know about TLC, their mission statement provides a good summary of who and what they are about.

TLC strives to create a healthier and more vibrant Triangle region by safeguarding clean water, protecting natural habitats, supporting local farms and food, and connecting people with nature through land protection and stewardship, catalyzing community action, and collaboration.

TLC nature preserves are open to the public. Each has well maintained trails and wonderful hiking experiences.  Many of the preserves protect unique ecosystems, creating truly special places for all to experience.

I completed the challenge in just under five months, knocking out the first two within days of each other.  The summer heat caused me to pause the challenge until September, finally wrapping up over Thanksgiving weekend.  What follows are my reflections and a few photos form each of the preserves I visited.

Flower Hill Nature Preserve

Flower Hill is TLC’s eastern-most preserve. Situated near the Johnston/Nash county line this “freak of nature” brings a piece of the Appalachians to the edge of the coastal plain.  The phrase, “freak of nature”, was used by noted North Carolina naturalist B.W. Wells to describe this unique microclimate on his first visit to the area in the 1930s.  

The preserve is just 10 acres with a simple out and back trail of less than a mile, but don’t let its small size keep you from making the trip.  Although the Catawba rhododendron (Rhododendron catawbiense) was not in bloom during my hike in early July, they were still a notable part of the flora of the preserve.  It is clear that the north-facing bluffs cut into the surrounding farmland by Moccasin Creek have created a rather unusual place.   

The highlight of the hike was when I was serenaded by a pair of wood thrushes (Hylocichla mustelina) as I took a short water break along the top of the bluffs (check out the brief video for your own 30 seconds of solitude with the thrushes).  I look forward to visiting Flower Hill again in the spring to see the rhodies in bloom.

Sunrise at Flower Hill Nature Preserve

Sunrise at Flower Hill Nature Preserve

Swift Creek Bluffs Nature Preserve

Swift Creek NP was well known to me having frequented it many times over the years.  I am especially proud that my oldest son completed his Eagle Scout project at the preserve, leading a group of scouts and adults to assemble and install the information kiosk at the west end of the park.

Much like Flower Hill, walking along the trails beneath the north-facing bluffs that rise quickly from Swift Creek, I entered a mature beach forest and a microclimate that transported me to the foothills of the Appalachians. It is easy to forget that you are in the middle of rapidly growing suburbia.  But that is part of what TLC is all about.  Preserving natural areas like this to provide greenspaces and to protect the waterways that supply our municipal water needs.  Some may not know, but Swift Creek feeds Lake Wheeler and Lake Benson, both of which are part of the City of Raleigh’s water supply.  They serve as backup reservoirs to Falls Lake, Raleigh’s primary source. 

The preserve is located off Holly Springs Road between Tryon and Penny Roads.  On each trip I pause to read a plaque that enshrines a wonderful poem, wild peace, that speaks to all who are young at heart and find themselves at home on a woodland path.

Beech grove at Swift Creek NP

Beech grove at Swift Creek NP

“wild peace” poem found at Swift Creek NP

“wild peace” poem found at Swift Creek NP

Horton Grove Nature Preserve

August proved too hot for hiking so it wasn’t until early September that I found myself at Horton Grove, TLC’s largest public preserve.  It offers over eight miles of trails and in addition to the mix of meadows, woods, and wetlands, Horton Grove provides hikers with a connection to families of enslaved persons who were forced to work the plantation that once occupied the area.  Each trail is named for a black family and some of the historic structures can still be found on the property.

I love the mix of history and nature as I explored two areas in this sizable preserve.  The large meadow will certainly be a future birding stop for me, particularly during spring migration.

Trailhead marker from Sowell Trail at Horton Grove NP

Trailhead marker from Sowell Trail at Horton Grove NP

Johnston Mill Nature Preserve

Found at the confluence of Old Field Creek and New Hope Creek, the Johnston Mill preserve looks quite similar to nearby Eno River State Park.  Once a hive of industry, as the name suggests, the area once was home to mills tapping the power of water as it made its way down to the sea.  Today, the streams and woodlands have largely returned to their natural state, save the large high-tension wire towers that stand watch over the Bluebird Trail.

It was a truly sparkling day in November that I first visited the preserve. The network of roughly five miles of trail provides hikers with a variety of hike length options.  Parking is available off Turkey Farm Road and Mount Sinai Road.  The two parking areas are linked by Robin’s Trail, with the other four miles or so of trails accessible as loops off of Robin’s.

Small stream at Johnston Mill NP

Small stream at Johnston Mill NP

White Pines Nature Preserve

White Pines NP holds a special place in my photographic journey.  I first visited the preserve in the spring of 2012 as part of a photo project I was working on with the Chatham County Conservation Partnership (read more about in Image Stories).  Each time I visit I discover something new.  Similar to other TLC preserves, White Pine is home to an unusual ecosystem.  It too is another microclimate that has allowed mountain and northern species to survive since the last ice age.  Here I walked among white pines (Pinus strobus) and mountain laurel (Kalmia latifolia), typically found hundreds of miles to the west and a few thousand feet higher in elevation.  Like Swift Creek and Flower Hill, its north-facing slopes provide a cool shaded habitat that allows these mountain species to thrive, despite the long hot summers typical of the Piedmont.

It was late fall and the last of the leaves were still filling the woods with color.  The heavy rains of the prior week left evidence of significant flooding along both the Rocky and Deep Rivers.  Near the site of the old cable bridge, I found a small sweetgum tree (Liquidambar styraciflua) still clinging to its leaves ablaze in sunlight as it streamed through the forest.  It has found a place in my portfolio as “Tree Shine”.

From what I have been able to learn, the old cable bridge was used by local children to get to school sometime in the first half of the twentieth century.  All that remains are the anchors and some of the heavy cable that once spanned the Rocky River.  It would be interesting to learn more of the history of this place.

“Tree Shine” taken at White Pines NP

“Tree Shine” taken at White Pines NP

Bailey and Sarah Williamson Preserve

The Williamson Farm & Nature Preserve was the final stop on my #HikeTLC challenge, and I took along two of my adult kids (socially distant of course) to share the experience.  The preserve is the only TLC public property with a working farm.  The site provides seven miles of multi-use trails for hiking and biking. 

The preserve is in the shape of a backwards “L” with a long narrow corridor that runs south from Mial Plantation Road to the Town of Clayton River Walk.  The preserve is also accessible from the south on the Neuse River Greenway via the Neuse River Connector trail located between mile markers 27 and 28.  The preserve provided us an easy walk round the Two Pond Loop trail.  I will have to make another trip soon to explore deeper in the preserve.  At around an eight-mile round trip, I may consider a mountain bike rather then hiking boots or devote a full day for the hike.  Regardless, there is still much to explore.

I am thankful for the TLC Hiking Challenge.  It was just the sort of challenge I needed to get me out of the pandemic rut I found myself in over the summer.  I am now hiking almost every week and making short trips to explore more of the piedmont and coastal plain here in North Carolina.

“The Sentinel” taken at Bailey & Sarah Williamson NP

“The Sentinel” taken at Bailey & Sarah Williamson NP

My First Art Exhibition


Performers from Cirque du Vol welcome art lovers to #FirstFriday opening of “Something for Everyone” @ 311 Gallery

Performers from Cirque du Vol welcome art lovers to #FirstFriday opening of “Something for Everyone” @ 311 Gallery

A long and strange year ended on a high note. Two of my works were selected to be part of the Something for Everyone exhibition at the 311 Gallery in downtown Raleigh, NC. Applying to exhibitions and galleries has been a learning experience.  First and foremost, I have learned I need to engage with gallery managers prior to submitting work for consideration, to learn who their clientele is and what sells and what does not in their gallery.  The jury for an exhibition or the gallery will likely have a variety of criteria they will be assessing.  When selecting artists and works the jury will look at quality and workmanship, design aesthetic, subject, and the message or emotion of the work. In the end, if the goal is to sell the work, it needs to align with the tastes and needs of the potential buyers that will frequent the venue.

When applying for representation at a gallery on the coast, I selected a collection of pieces that represented a truly cohesive body of work. They were artistically interesting black and white images which I had produced as gallery wrap canvas prints.  Although the jury was impressed with the quality of the work, my submission was not selected as it was deemed to not be readily salable in the gallery.  Speaking with the gallery manager after having my work deferred, I learned that when it comes to photography, their clientele are vacationers that are looking to take a piece of the beach home with them.  As such, the work that sells has a very recognizable subject, vibrant colors, and is presented as a traditionally matted and framed photograph.  With this learning in hand my next submission to the gallery will be a collection of color images of life and moments along the Outer Banks, rather than the coastal themed black and white canvases that were deferred.

Collection of B&W image deferred by a gallery

Despite the COVID restrictions, the 311 Gallery was able to hold a socially distanced opening for the Something for Everyone exhibition.  During that evening event I spoke not only with the gallery owner, but easily half a dozen other artists to learn what I could from their collective experience.  The common message was clear, be persistent and expect that it will take time to build the following and find the gallery(ies) that are a good fit for my work.  I am grateful for the support and information provided by everyone I have encountered thus far in my nascent art career.

As I look ahead, I have already applied to two other local exhibitions and have plans to apply to many more as the opportunities arise.  I have also joined several artist groups to further expand my network and become more active in the Triangle arts community.  Check back for future blog posts to for updates on my artist’s journey.

Art for the Holidays

holiday-gifts-1920px.jpg

Our recent stretch of warm weather and the apparently never-ending Atlantic hurricane season (I never would have thought we would be this deep into the Greek alphabet (Iota!), do not set one to thinking about the winter holidays. But Christmas is just 39 days away (Yikes!) and only 24 days till the start of Hanukkah.  It has been quite a year, and I for one am looking forward to brighter days ahead. 

The holidays are a time for giving thanks and showing our love and appreciation for the people in our lives through the exchange of gifts. We will not be able to gather and celebrate as usual this year, so the choice of gift is just that much more important.  Art can make an ideal gift.  It is unique and personal, reflecting the tastes of the recipient and the giver.  Art is also a gift that keeps giving.  Each time the recipient sees it on their table or hanging on the wall, they think of the person who gave it to them.

Buying art in the Covid-19 era has changed.  The art fairs were all canceled, and many galleries have been forced to limit hours, cancel events, or shutdown entirely. This leaves art buyers searching for alternatives.  To answer the need the art market has made a swift move to online e-commerce.  Individual arts and galleries are now offer online viewing and purchasing of their art. Have a look through my online art gallery and see who you can check off your holiday gift list today!

Additionally, each gallery and artist are a small business. Small businesses have been hit hard by the pandemic.  Buying art from local artists helps support local businesses and your arts community.  This holiday season think about giving art to those you love and support your local arts community.

Happy Holidays!

Art: What is it and why do we buy it?


Wall of art in an art lover’s home.

Wall of art in an art lover’s home.

What is art? It's often said that art is in the eye of the beholder. And we need not look further than the work entitled, Comedian, of Italian artist, Maurizio Cattelan, to see what is really meant by that statement. What some see as ephemeral transcendent art, is merely a banana duct taped to the wall to others.

So what is art?

I put forth that art is anything that is created that makes you think, feel deep emotion, or simply brings you joy. So yes, it is in the eye, mind, and heart of the beholder.

Given my definition above, the reasons we buy art are as varied as the people that are drawn to it. I have purchased works of art for many reasons. Often it is to fill and empty space on a wall, or complete a design makeover of a room. Other works have been acquired for gifts or simply because it “spoke to me”.

The whole process of buying art I find thrilling and fraught with problems.  Unlike buying an appliance or new electronic gadget, you really can’t use an objective assessment, feature comparison, or customer reviews to help you find the best artwork for your needs. If you are looking to fill a specific space, then the work’s dimensions clearly play in the selection as does the color pallet used in the piece.  That about does it for objective attributes in the decision process. Another consideration is what role will the work play in the room.  Are you looking for a statement piece or supporting player. 

Another consideration is uniqueness of a work.  Are you looking for an original work, one of one, or a limited edition print?  Perhaps you are on a budget and a mass-produced poster print is all you can afford.

Who creates the work can play a role as well when buying art. Does meeting and getting to know the artist add to the buying experience, or is the work all that matters to you?  Is it important to have a work from a well-known and respected artist, or are you searching for a new up and coming creator?

I have observed customers as they first encounter my work at an art fair and watched as they work their way through the buying process.  One of my first customers saw a pair of prints from a ways away and made a beeline for my booth. She declared they were “perfect” for her office”, and she bought them without hesitation.  I have also had customers who clearly connected with a piece. I watched them silently transfixed staring at the print for several minutes only to disappear as silently as they arrived.  Then some time later return to ask a few questions and take the print home.  I have also seen buyers who looked to family and friends for validation of their purchase.  For some the consultation is between household members who must agree on art for their shared walls.  Other conversations appear to be looking for guidance or validation of their tastes.  In the end purchasing art is a very personal thing. 

What stories can you share about art purchases you have made?   

My Favorite Photography Smartphone Apps


It is a great time to be a photographer. We have access to virtually all photographic techniques from large format film cameras, silver gelatin, and alternative process, to the latest digital platforms with amazing sensors. Additionally, we have access to tools and information that was unavailable, frankly unthinkable just a decade or two back. High-speed Internet and mobile phones bring a whole new set of resources to photographers and landscape photographers in particular.

Google Maps (free)

G-Maps.png

The single greatest value I get from my smartphone and apps comes in the planning phase of a photo shoot. If I am heading to a new location that I have not shot before, my first stop is to Google Maps. There is no better way to begin to get the lay of the land than by exploring a place in satellite view on Google Maps. Whether it is working outs directions and available parking or identifying potential subjects and areas to explore, poking around a place from a bird’s eye view helps me quickly get oriented.  It also saves me time on location because I have already done my first level of scouting and exploring. Google Street View puts you virtually on the ground anywhere in the world. 

Photographer's Ephemeris ($9.99 iOS and $2.99 Android)

My next stop is often to Photographer's Ephemeris.  This app combines satellite imagery with an ephemeris. So what is an ephemeris, aside from being an awesome word for your next Scrabble or Words with Friends game. Wikipedia defines it this way.

In astronomy and celestial navigation, an ephemeris gives the trajectory of naturally occurring astronomical objects as well as artificial satellites in the sky, i.e., the position over time.

What that means for landscape photographers is you can know in advance where the sun and moon will rise and set anywhere on Earth at any point in time. This allows me to plan out shots well in advance and get a pretty good idea where I might want to position myself to make an image.

Here’s an example.  I knew I would be driving through the Cascade Mountains in Washington while on a business trip. I identified Lake Wenatchee State Park on Google Maps and then using Photographer's Ephemeris I determined where and when the sun would set (see screen shot).  With information I now had a loose sketch of a plan.  Find a compelling foreground subject, facing west with the lake in the mid-ground and sun setting over the mountains in the background. The image below, Lake Wenatchee, the Fallen, is the image I created based on this plan.

TPE+Lake-Wen.png


Weather Apps

I don’t know if it is me or the weather apps available, but I find that I switch apps every year or two because I get frustrated with the user experience when they do a major update.  At present, I have five weather related apps installed: Weather.com (free w/ ads), Weather Underground (free w/ ads), My Radar (free w/ ads), Clear Outside (free), and the app from a local TV station (free w/ ads). Like any outdoor activity, it pays to know weather forecast before you go out to shoot.  In addition to the safety and comfort befits of be prepared for the weather you will encounter, there are also photographic benefits as well.  A compelling landscape image must have some clouds in the sky, but not too many or in the wrong place.  Learning to translate weather forecasts into photography forecasts will likely be a blog of its own one day.  The simple answer is you want to know what the weather will likely do so you can plan your shooting accordingly. For example, high pressure and clear blue skies, tells you to skip the sunrise and sunset shots, you need clouds to catch the spectacular light.  Another example is on a day that you will be socked in with gray skies and occasional drizzle makes for the perfect time to shoot long exposures of waterfalls and streams.  The wet foliage and soft defuse light make for deep saturated colors and smooth water without blown out highlights.

One of my favorite weather conditions to shoot in is fog. It removes cluttered backgrounds to isolate subjects that you could not successfully shoot in good weather.  Unfortunately, fog is one of the hardest weather types to forecast more than 6-12 hours out. The Clear Outside app now includes fog as well as low, medium, and high cloud layers in its forecast.  The cloud forecast is useful for planning broad landscape shots, but the fog forecast can be critical if you have a specific subject in mind that requires that kind of isolation.

Additionally, the moments just before and after storms often present some of the best light and dramatic skies. Using your weather apps to monitor storms and to safely position yourself to be able to take advantage of the storm drama can be quite rewarding.

Trigger and Camera Control Apps

Tigger-apps.png

A number of years ago I discovered a small Kickstarter company called TriggerTrap.  They had created an app that when connected to your camera via a dongle ($49 USD) that plugged into your phone’s headphone jack would allow you to control the shutter in a number of interesting modes including, long exposure, timelapse, hyperlapse, sound trigger, and remote trigger (requires two phones).  I bought the dongle and installed the app which was free.  It did all it was advertised to do.  I used it to capture long, multi-minute exposures, it made creating star trails a breeze, and I even played around with using sound as a shutter trigger.  Unfortunately, the company shutdown on January 31, 2017. Their software has since become open source.  Since that time a number of other camera control apps and devices have it the market.  I was pleasantly surprised to find that the MIOPS app is compatible with the TriggerTrap dongle. MIOPS also sells a similar dongle.  Like TriggerTrap, the MIOPS app is free.  They expect you to buy one of their controller gadgets or dongle ($49 USD).  Regardless of which controller app and cable/device you choose, these tools open up new creative avenues to explore. I also found that if you have an old phone laying around that still works, but that you deactivated with your wireless carrier, you can still install and use apps on it via wifi and the trigger apps are a great use for the old phone.  Get a handlebar mount for your phone and clip it to your tripod leg, run the cable to the port on your camera and now you have a touchscreen controller app conveniently placed.  You can now go shoot astrophotography or setup a timelapse to create a video.

Nikon Manual Viewer 2

Nikon-Man.png

Calling Nikon Manual Viewer 2 one of my favorite apps is not quite accurate.  The user experience leaves room for improvement.  But it is on my list here because I can now carry with me manuals for every bit of Nikon kit I own.  Why is this important to me, well for one, there are some features and configuration options I don’t use very often and given the often unintuitive Nikon menus, having a easily accessed searchable resource can be a life saver.  I most often consult it to setup my camera and flash for remote trigger.  I use my flash only a couple of times a year and getting the camera and flash talking to each other nearly always requires at least a quick scan of the manuals.

Instagram

If you are an artist or professional photographer today it would be very hard to attract and retain customers without a presence on Instagram. Instagram is often the subject of heated debate among pros.  It has turned everyone into “photographers” and like any social media platform can easily get you chasing ♥ “likes” to the detriment of your craft and business.

That said, it is also a necessary marketing tool.  Art buyers will often ask me if I’m on Instagram and will review my posts to see if they want to stop by my booth. The grid view of your posts is effectively your portfolio.  So be selective in what you post and assure the collection appears cohesive and represents your best work.  You can use Instagram Stories to post content other than your finished portfolio images.


Creativity: The Silver Lining of Self-Isolation

All of our lives have been upended in the past few weeks. Our daily routines of getting up, feeding the family, getting the kids off to school before heading into work, have been replaced. Now the kids are home, many with little or no direction from their schools and teachers. We can only leave the house for “essential activities” and if you are lucky enough to be able to continue working, most likely you are doing it from home (thank goodness for high-speed broadband).

With more time on our hands it appears we are all spending more time on social media. Aside from the flood of COVID-19 and quarantine related memes, the most common posts I am seeing are of people sharing their acts of creation. It is WONDERFUL! People are baking bread, some for the first time. Others are breaking out the paints, pencils, and all imaginable mediums to create art. Those with musical gifts have been sharing mini concerts streamed live from their living rooms.  The silver lining from all of our isolation has been a marked increase in creative output and more importantly, engagement with family, friends, and the world at large via online platforms to share our creative works.

Mortise & tenon joint that will be part of a new railing.

Mortise & tenon joint that will be part of a new railing.

I noted in my last post that life stress was crushing my creativity, particularly as it related to my photography.  I have been doing a better job managing my stress level, first by taking walks in the woods, and now by rediscovering my woodshop. So why the woodshop you ask.  Well even though our county and state “stay at home” orders allow for outdoor activities, as long as you practice good social distancing and avoid all group activities, Mother Nature has seen fit to keep me indoors just the same.  In a word, allergies. A few years after moving to North Carolina, I began to develop seasonal allergies, most notably tree pollen.  So as long as the trees are happily reproducing, I am relegated to indoor activities.

If you haven’t taken on a creative project in your hours of isolation, I highly recommend rediscovering one of your old hobbies, or exploring a new one.  If you live with kids, involve them in the creative process as well.  Put down and shutoff the screens (after reading my blog of course) and let your creativity shine.  I would love to know what you create, so share what you make and tag it with #creatinginquarantine.

My Reading List for 2019

This week I thought I would share my current 2019 reading list as it relates to my photography. The books fall into basically three categories: technique & technology, creative inspiration, and spiritual insight. My photography is at its best when I am fully able to tap these three areas.

Spiritual Insight

Sacred-Depths-of-Nature-Cover.jpg

First up is Sacred Depths of Nature, by Ursula Goodenough. It is first on the list as I just finished it, so I’m counting it on my 2019 list. As some of you know I was raised in Episcopal tradition and was quite active in the church in my youth and again when I had children. More importantly, throughout my life I have been a deeply spiritual person. My spiritual strength has been drawn from my time in nature. Weather it is walking the trails of a local park at dawn, or lying under a blanket of stars on a glacial moraine in the in Olympic National Park, my soul is fed and healed when I am immersed in the natural world. I am also a person of science. I have a thirst to understand our universe and our place in it. Some say that religion and science are at odds. I see it differently. Science is our never ending pursuit to understand the mechanisms and composition of our universe. Religion and more broadly spirituality, is the pursuit of understanding of that which is not measurable, that which transcends the physical universe.

Ursula Goodenough’s Sacred Depths of Nature is an important contribution to the dialog between science and religion. The book begins with the origins of the Earth and life, and then progresses through the evolution of life from single-cell to multi-cellular life forms. Successive chapters explore awareness, emotion, sex and sexuality, and ultimately death. At the end of each chapter she offers up a religious response to the topic, most often drawing from Judeo-Christian traditions. She includes reflections from other traditions as well. I found it to be an enjoyable and insightful read. Dr. Goodenough is a cellular biologist with a PhD in biology from Harvard. As I read the book, it was clear that the author’s was most familiar with the inter-workings of cells, yet her writing style is quite accessible, even for non-scientists. If you are trying to rationalize religion and science, I encourage you to give Sacred Depths of Nature a read.

Creative Inspiration

Around-the-World-in-80-Tree-Cover.jpg

I have a couple on tap in the creative inspiration category. I received a thoughtful Christmas gift of Around the World in 80 Trees, by Jonathan Drori. The book takes the reader on a journey around the world through a series of short essays. Each essay introduces the reader to a tree that is representative of a country. The journey begins in the UK with the London Plane, Platanus × acerifolia. The essays are quick and easy reads that provide a rich description of the tree. With the image of the subject clear in the reader’s mind, Drori explores the relationship of it with humans, from early civilization to present day. I have enjoyed learning about a few trees each night before turning out the light. I have made it from Europe to Africa with three quarters of the world yet to explore.

The-Fountainhead-Cover.jpg

Based on a recommendation from Cole Thompson, I picked up a copy of Ayn Rand’s, The Fountainhead. Cole referenced this book as a source of inspiration in his personal journey to find and express his creative vision. The Fountainhead centers around an architect, Howard Roark, a creator with a very unique vision which threatens conventional thinking. One Cole’s favorite Roark quotes is, “A creative man is motivated by the desire to achieve, not by the desire to beat others.”  This idea resonated with me as well. I have avoided photo competitions and it was through a conference session with Cole Thompson where I first truly understood why. As I continue on my journey to find and express my vision, I hope to find inspiration from Howard Roark as well.

Technique & Technology

Remote-Pilot-Test-Prep-Cover.jpg
Pilots Handbook of Aeronautical Knowledge-Cover.jpg

One of my 2018 goals that has pushed into 2019 is to earn my FAA Part 107 Remote Pilot Certificate (aka drone pilot license). To aid me in the learning and test prep process I have acquired, several texts including: ASA Remote Pilot Test Prep 2019, FAA Pilot's Handbook of Aeronautical Knowledge, and FAA Remote Pilot – Small Unmanned Aircraft Systems Study Guide. To earn a remote pilot certificate involves taking an FAA exam on aeronautical knowledge. The test covers airspace classification, drone regulations, and reading aeronautical charts. Wish me luck…

I’m sure other books will find their way to my night stand or onto my tablet this year, but this feels like a good start.